
Before replacing a shower head, assess the current setup, gather essential tools like adjustable wrenches, pliers, and thread tape, and identify the attachment style (thread-on, quick-connect, or bayonet) for secure installation without leaks or pipe damage. Ensure you have the correct new model and necessary materials like pipe joint compound and a bucket to prevent water spills during the DIY project.
Tired of that stubborn, old shower head? Learn how to replace it without damaging your pipes. This step-by-step guide walks you through every phase, from assessing the situation and gathering the right tools (yes, we’ve got a list) to loosening that tenacious fixture and installing a fresh one. We’ll show you precautions to take and tips for a smooth replacement process, ensuring a luxurious shower without plumbing headaches. Discover expert advice on how to replace a shower head like a pro!
- Assess the Situation and Gather Tools
- – Identifying the type of shower head
- – List of necessary tools
Assess the Situation and Gather Tools

Before you begin, assess the situation and gather the necessary tools. This is a crucial step in how to replace a shower head without causing damage to your pipes. Check if the old shower head is still attached to the wall or if it’s loose. If it’s firmly in place, you’ll need a wrench or pliers for removal. Ensure you have a new shower head that matches your existing model and size—the wrong fit can cause leaks. Gather other essentials like thread tape, pipe joint compound, and a bucket. These tools will help you create a secure seal, ensuring no water escapes through the joints after replacement.
– Identifying the type of shower head
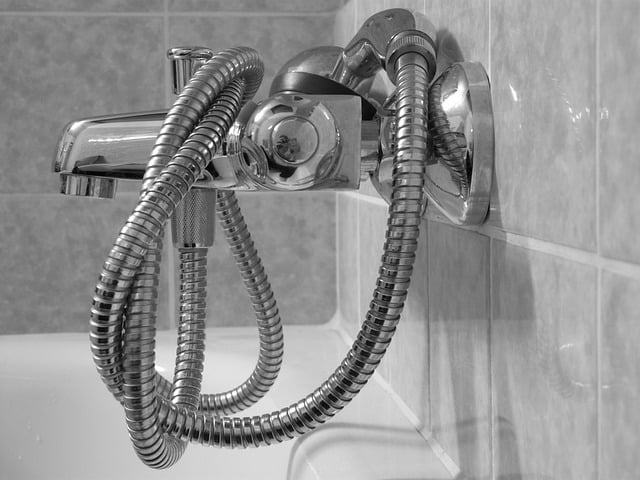
Identifying the type of shower head is the first step in successfully replacing it without causing pipe damage. There are various types of shower heads available, each with unique attachment mechanisms. Common styles include thread-on, quick-connect, and bayonet-style. Thread-on shower heads use standard threads, often found on older fixtures, requiring a specific torque to tighten securely. Quick-connect systems are more modern, featuring a simple twist-and-lock mechanism, while bayonet designs have a distinct three-pronged connection. Understanding your current shower head’s attachment style is crucial for choosing the right replacement and ensuring a secure fit.
When you know what type of shower head you need, “How to replace a shower head” guides become invaluable resources. These guides provide step-by-step instructions tailored to each attachment style, offering tips on tools required and common pitfalls to avoid. This knowledge empowers you to tackle the replacement process with confidence, ensuring your new shower head is securely installed without damaging pipes or causing leaks.
– List of necessary tools

To successfully replace an old, stubborn shower head without damaging your pipes, you’ll need a few basic tools. Start with a set of adjustable wrenches or pliers, ideal for gripping and turning tight fittings. A rubber mallet is also useful for gently tapping the shower head in place to loosen it, protecting both the head and your pipes from unnecessary force.
Don’t forget a new shower head, ensuring it’s the right size and thread type for your existing pipe connections. A teardrop-shaped tool designed for removing shower heads can be beneficial too, as it helps leverage the head free. Lastly, have some old towels or rags on hand to catch any water that might spill during the process. With these tools ready, you’re well-equipped to tackle this DIY project and replace your shower head with ease.
Removing an old, stubborn shower head can seem daunting, but with the right tools and some careful maneuvering, you can replace it without causing any damage to your pipes. By first assessing the situation and gathering the necessary tools, as outlined in this guide, you’ll be well-prepared to tackle this DIY project. Remember, a little patience and persistence go a long way when it comes to How to Replace a Shower Head successfully.